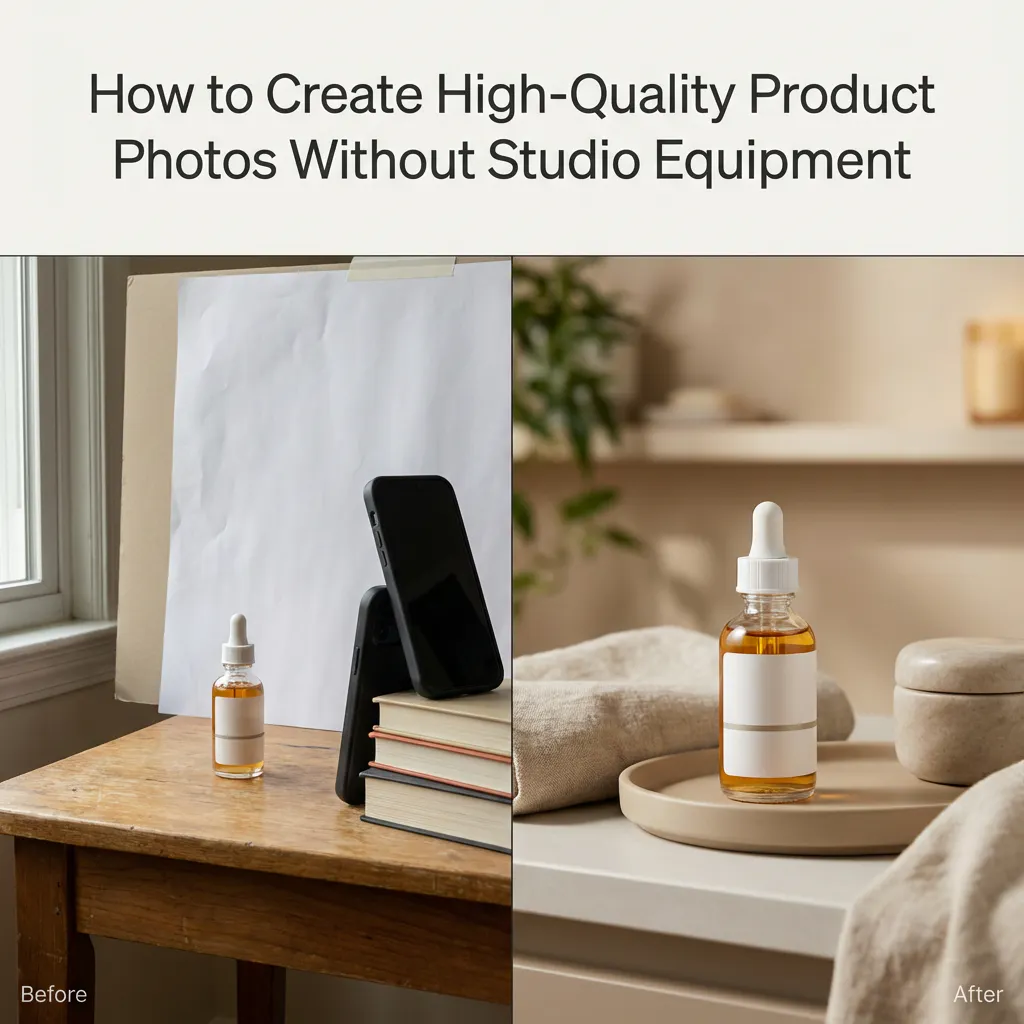
If you’ve been following us so far, you already know one thing: we’re not here to push theory-heavy content or ideal-world advice. We understand the reality. Not every brand has access to high-end studios, professional lighting, or photographers. If you’re an early-stage brand, a solo founder, or working with small volumes, you likely have access to none of these—and that’s okay.
Because customers don’t care how your photos were taken, they care about how the product looks. Visuals are the first filter for trust, perceived quality, and willingness to pay. The good news is you don’t need expensive equipment to get started. The truth is that raw photos alone are rarely enough. This guide focuses on getting usable output even when your photos start off badly—and how Blend bridges that gap.
What You Actually Need to Get Started
Before considering angles, editing, or enhancements, it’s important to reset expectations. A lack of equipment does not cause most product photography problems; they stem from poor inputs. If the starting image is fundamentally flawed, no amount of post-processing will fully compensate.
To get workable outputs from imperfect but editable raw images, you don’t need heavy equipment or studio-grade tools. What you need are clean inputs created with simple, everyday resources used correctly. Getting this foundation right dramatically increases the quality ceiling of everything that follows, including editing and enhancement. So let's have a look at them:
1) Camera
You don’t need a professional camera to get started. A modern smartphone is more than enough. The camera’s role here is simple: capture a sharp, clean image that can be enhanced later. Most quality issues come from how the camera is used, not which camera is used.
What works is surprisingly simple. Use the rear camera instead of the front camera, clean the lens before shooting, and keep the phone steady, resting it on a table or any stable surface if needed. Always tap to focus on the product before taking the shot, and capture multiple images from the same angle rather than relying on a single frame. These small habits significantly improve sharpness and consistency without requiring any additional equipment.
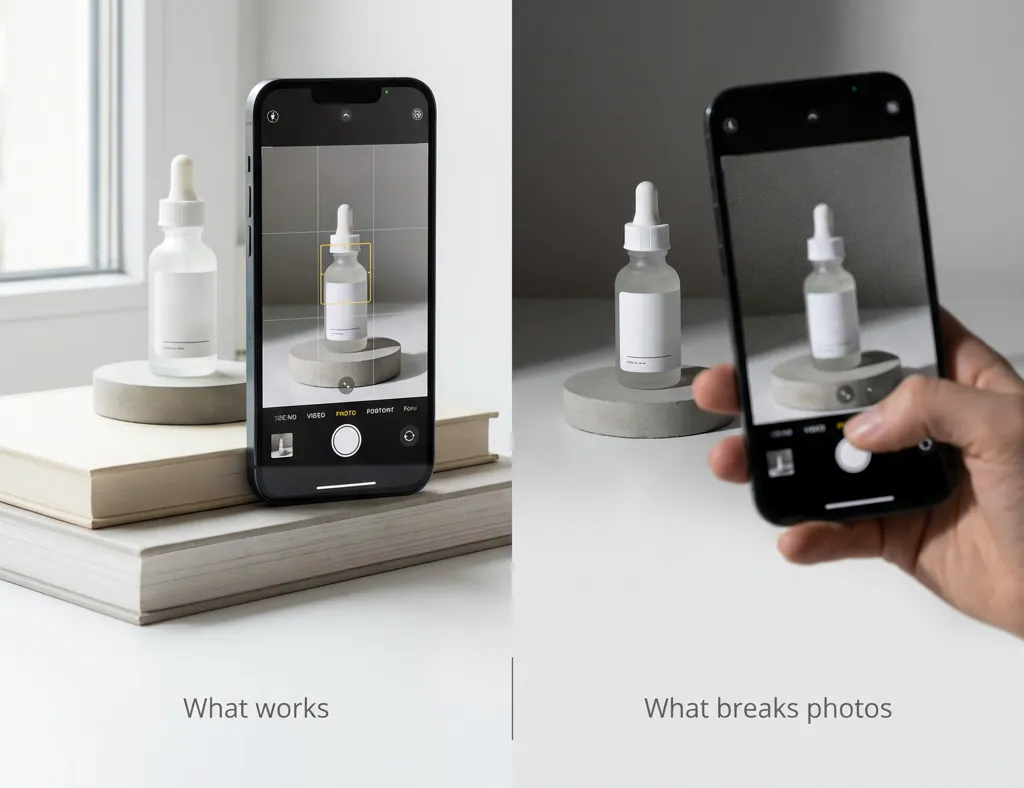
What breaks photos is equally straightforward. Digital zoom degrades image quality, shooting handheld in low light introduces blur, and ignoring focus or exposure leads to unusable results. Relying on a single shot leaves no margin for error. At this stage, the camera is simply a capture tool—sharpness and clarity matter far more than specs, settings, or gear.
At this stage, the camera is just a capture tool. Sharpness and clarity matter far more than specs or gear.
2) Natural Light
Natural, indirect daylight solves the majority of lighting problems and is often better than inexpensive artificial lighting setups. Shooting near a large window with diffused light creates soft, even illumination that flatters most products and preserves surface detail without harsh shadows.
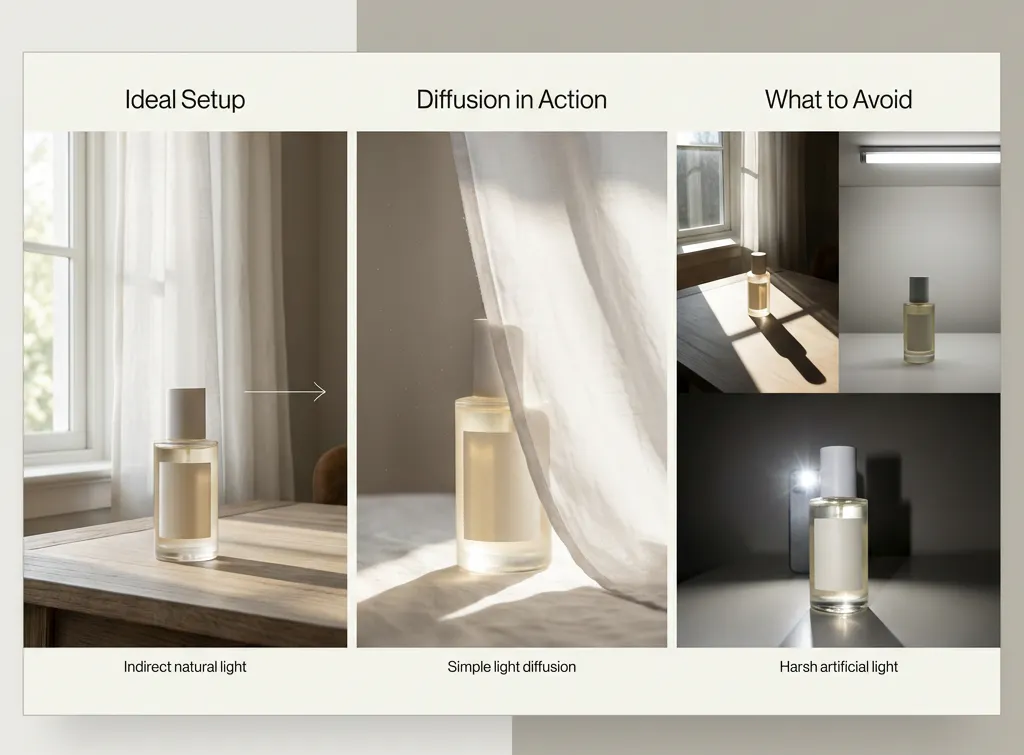
What works is using indirect natural light, shooting at the same time of day for visual consistency, and diffusing intense light with a curtain or white cloth. What breaks images is direct sunlight, overhead tube lights, and using the phone flash. If lighting is harsh or uneven at the capture stage, no amount of editing will fully fix it later.
3) Background
Backgrounds should support the product, not compete with it. When working with minimal equipment, simple backgrounds are consistently the most effective: plain walls, white or neutral fabric, or even plain paper. These options keep attention where it belongs and reduce visual complexity during capture.
The goal is to remove distractions so the product remains the clear focus. Busy backgrounds, strong textures, or unrelated props introduce visual noise, making images more challenging to interpret, especially on marketplaces where attention spans are short. A clean background is not a stylistic preference; it is a clarity requirement.
What to Get Right While Shooting
Once the basics are in place, the quality of your output depends on what you prioritise during the shoot itself.
This section focuses on the decisions that actually improve results.
1) Angles
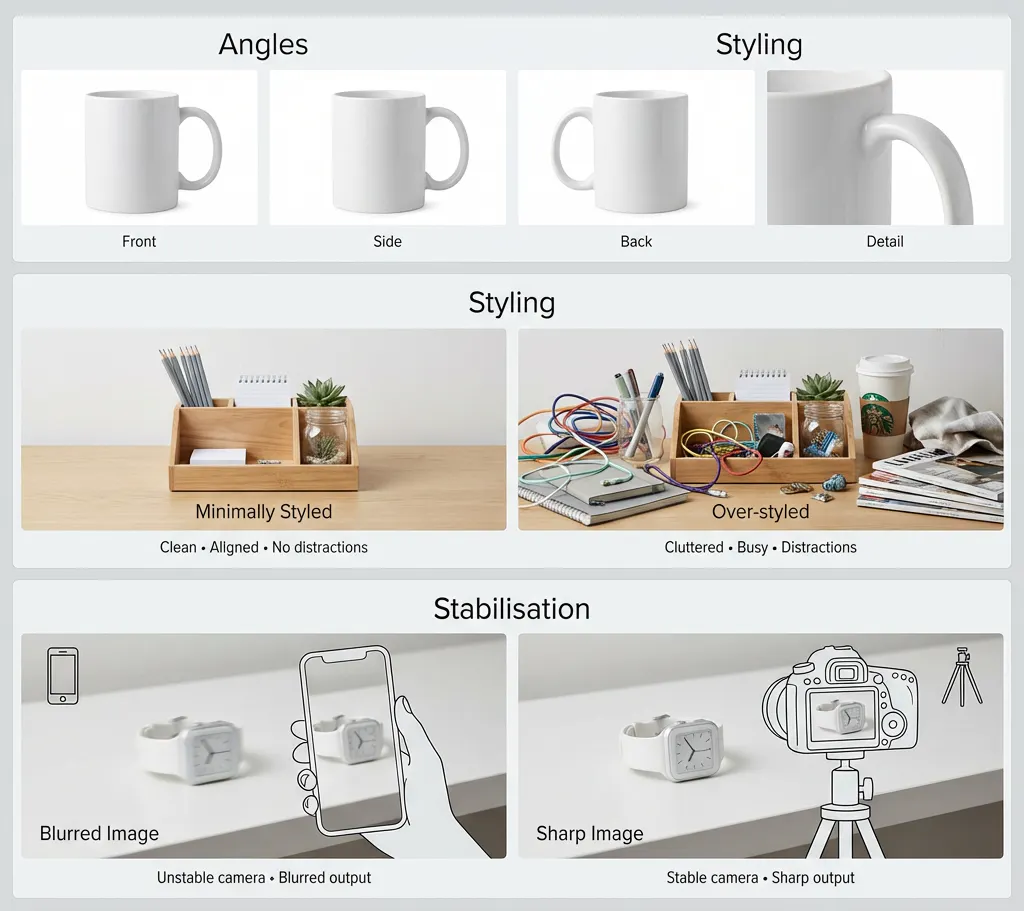
One image is never enough. Buyers rely on multiple angles to understand a product’s shape, structure, and finish, and each angle should exist for a reason. Every frame should answer a specific question about the product rather than repeat what is already clear.
At a minimum, capture a front view for overall appearance, a side view for depth and silhouette, a back or underside view to show construction, and close-ups that highlight material, texture, or hardware. Shooting for coverage reduces uncertainty and increases buyer confidence. Missing angles create doubt, while redundant angles add no value.
2) Styling
With limited equipment, styling should remain minimal. Over-styling often does more harm than good when resources are constrained, as props, complex arrangements, or heavy composition can distract from the product and expose inconsistencies in lighting, focus, or framing.
Effective styling with minimal gear means keeping the product clean and presentable, properly aligning it, and avoiding unnecessary elements altogether. In product photography, restraint usually outperforms creativity—clarity and consistency matter more than visual embellishment.
3) Stabilisation
Sharpness matters more than visual flair. Even well-lit images fail if they are not sharp, and camera shake remains one of the most common reasons product photos look unprofessional.
Simple stabilisation methods make a meaningful difference. Using a tripod, resting the camera on a stable surface, or using a timer instead of hand-triggering the shutter all reduce motion blur. Stabilisation ensures clarity, and clarity is non-negotiable in commerce photography.
Improving Results After the Shoot
Enhancement is not about fixing careless shooting. It is about elevating decent inputs into usable, consistent outputs.
If your images are in focus, evenly lit, and clearly framed, post-processing can add real value. Let's see some post-shoot enhancements that get you output worthy of marketing.
1) Image Cleanup
Basic cleanup is about standardisation, not transformation. This includes cropping for alignment, correcting exposure and contrast, and straightening perspective. These steps make images easier to scan, compare, and place consistently across a catalogue.
It is equally important to understand what enhancement cannot fix. Harsh shadows, motion blur, and incorrect lighting direction are capture-stage failures. Editing can polish inputs, but garbage in still means garbage out.
2) Consistency Across Images
Consistency is what separates a random collection of photos from a credible catalogue. Even with minimal equipment, consistency can be maintained by using the same background, keeping the camera position fixed, and shooting all products under similar lighting conditions.
This visual uniformity builds trust and signals professionalism. Customers may not consciously notice consistency, but they immediately feel its absence.
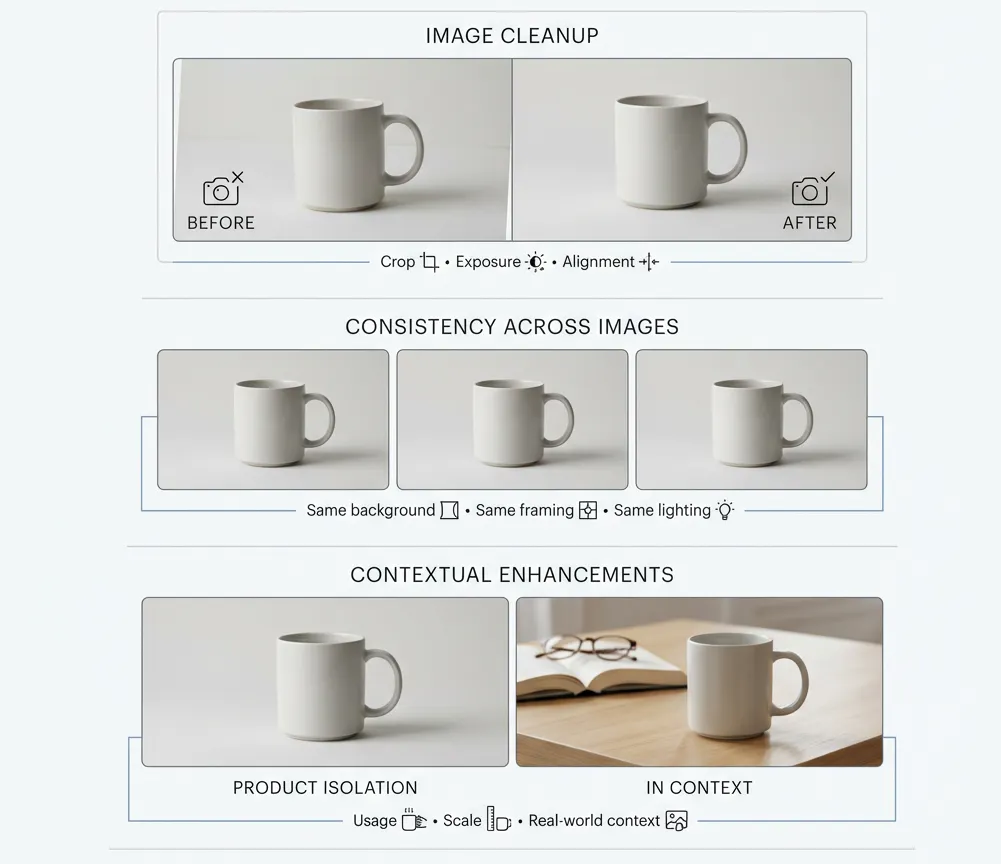
3) Contextual Enhancements
Context should only be added when it serves a clear purpose. Used correctly, contextual or lifestyle elements can help show scale, demonstrate usage, or add realism to a product image.
Avoid adding context to make an image “look interesting.” If context does not improve understanding, it introduces distraction and friction rather than value.
How Blend Fits Into This Workflow
Blend is designed specifically for visual commerce workflows. Rather than treating each image as a one-off asset, it treats product imagery as a system that needs to scale reliably across an entire catalogue.

By cleaning and standardising images, applying consistent visual rules, and enabling batch workflows, Blend turns basic product photos into commerce-ready visuals. This eliminates repetitive manual work and allows teams to focus on accuracy, consistency, and scale rather than constant re-editing.
This turns basic smartphone photos into usable, scalable visual assets.
Conclusion
Product photography with minimal equipment works when the workflow is disciplined. Clean inputs, good lighting, the right angles, and restraint during shooting matter far more than expensive gear. The real challenge is not creating a single good image—it is maintaining quality and consistency as your catalogue grows.
That is where Blend fits in. Blend helps turn simple product photos into clean, consistent, commerce-ready visuals without adding manual effort or operational complexity. If you are already shooting in-house and want your images to scale with your catalogue, Blend enables that reliably.
Explore Blend and see how it fits into your product photography workflow.